
Search engines can’t keep up with the millions of pieces of content on the internet due to the growing size and complexity of websites. Search Engines may not be able to find content in large websites, so it is important to ensure that visitors can find what they are looking for. This will help to ensure that visitor stay on your website and close sales. This step-by-step guide on how to create a XML sitemap in WordPress.
What is an XML Sitemap?
An XML sitemap is a file that catalogs a website’s key pages so that Google can identify and crawl them all. Additionally, it aids in the structure-understanding of search engines. You want Google to index all of your website’s key pages. However, occasionally pages are created without internal links connecting to them, making it difficult to find them. Discovering content can go more quickly with a sitemap. There are several advantages to having an XML Sitemap on your website. Let’s take a look at a few:
What are the advantages of having XML Sitemap on our Website?
-
- Faster crawl times – Sitemaps can make it easier for search engine robots to crawl your content more quickly than they otherwise would. This may also result in a quicker indexing of your content.
- Prioritized crawls – By including metadata in your sitemaps, you may instruct Google to crawl specific pages on your website more frequently.
- Rich Media Content – When you have a lot of media material, such as videos and photographs, Google can take additional information from sitemaps into account for search, where appropriate.
- Easier Page Indexing – Sitemaps typically include useful data like the date of the most recent update. As a result, search engines can retrieve this information and “see” the requirement to crawl updated content. This function is particularly crucial for dynamic, ever-changing websites that frequently update their information.
The reason you require this is that Google would like to have an orderly list of everything on your page. Consider it a map for all of the material on your website. So, to cut a long tale short, you need an XML sitemap to provide Google with a very clear, clean map of how to look at all of the information on your website, which is critical for SEO. Without one of these, Google has to sort of wing it and discover all the information in rock and really understand how it’s all organized on your site. Their way to set this up is very easy. So let’s jump in and do that.
How to Install XML Sitemaps Plugin on your Website
The first step is to login to your WordPress website’s dashboard. Then, on the left-hand panel, hover your mouse over the Plugins menu and click Add new.
Type “XML Sitemaps” into the search box in the right corner after that. You’ll notice a list of other plugins, several WordPress plugins could help you in creating a custom sitemap. Nevertheless, we’ll be utilizing the XML sitemaps plugin, which has more than a million active installations. We can say that this serves as a helpful criterion for figuring out whether a plugin is appropriate for a website. Although this is not the only criterion we want to employ when determining if a plugin works best for us, it is a useful one to consider given that we will be focusing on establishing sitemaps on your website. Then click on the Install Now button next to the plugin.
Finally, click the Activate button next to the plugin to complete the process of adding it to your website.

The good part is that we’re technically done as soon as we activate that plugin because it generates our site’s XML sitemap, which is now available for Google to crawl. But let’s go ahead and take a brief look at the plugin’s default settings. Again, we want to keep everything as simple as possible and it’s very simple to go over the basics of how to do this and why you need it.
So, this is basically what a site map looks like. If you go to your sitemap, which is simply your site URL, slash sitemap.xml in the URL box.
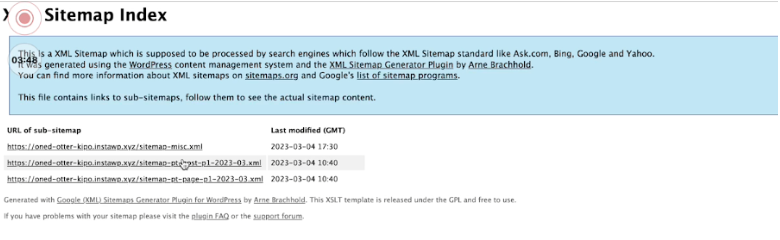
Larger websites will have a lot longer list here along the way, but we just wanted to show you what a site map looks like.
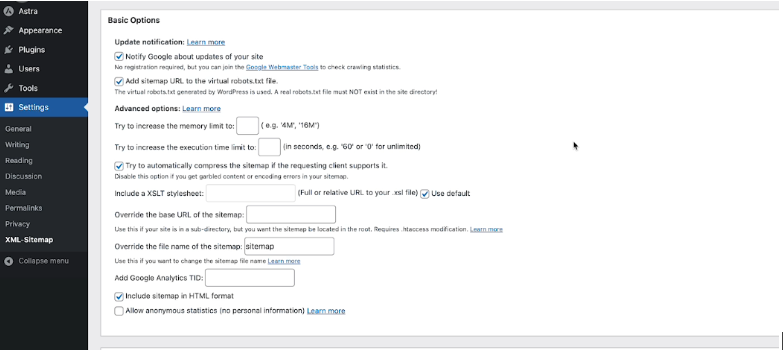
Let’s discuss some of the XML Sitemaps Plugin Basic Options:
- Notify Google about updates of your site
It will notify Google whenever your website’s content is updated.
- Add sitemap URL to the virtual robots.txt file
This is another file on your website which is essential tools for optimizing your website’s crawling and indexing by search engines.
- Try to automatically compress the sitemap if the requesting client supports it
This will try to compress the sitemap automatically.
- Include sitemap in HTML format
This allows Google to search the sitemap in HTML format.
Here are a few more random features you might want to experiment on your Sitemap’s Content, although the default options are very common. What should and should not be included in the sitemap for Google? Naturally, we wanted to incorporate our homepage, all of our content, product categories, and tags for e-commerce, as well as our static page. However, the three most crucial things we want Google to view are pages, posts, and the homepage.
It is up to you whether or not to include categories, archives, author pages, and tag pages.
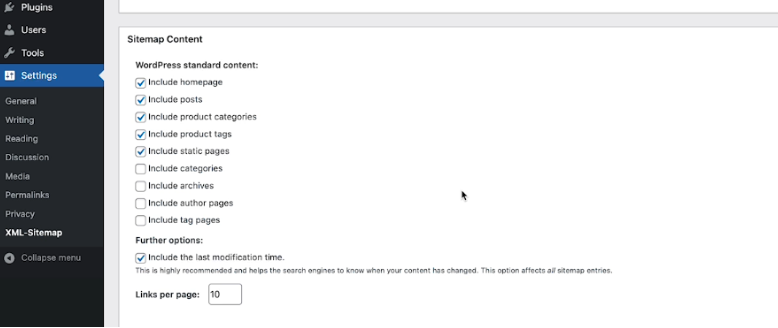
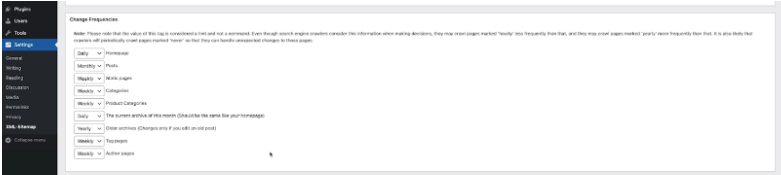
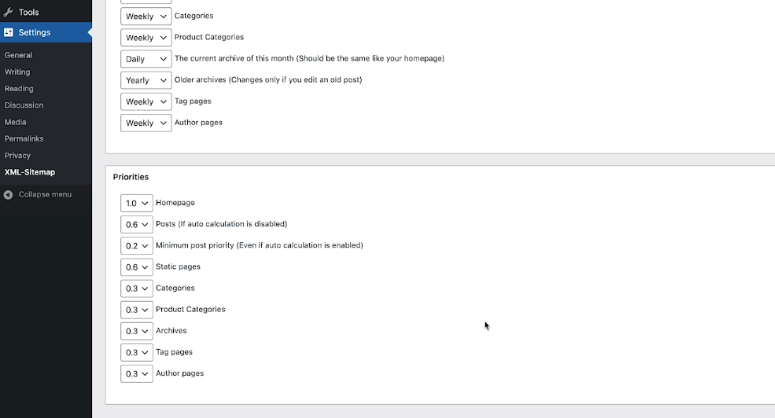
Next would be the “Change Frequencies”, it is simply how frequently the change frequencies are reported to Google. As we can see, the home page would be Daily Post or Monthly Post. You can tell how frequently our site map is updated. You can raise this frequency if you wish to for folks who are doing more SEO work on their site, but by default, it is good.
Finally, the Priorities section tells Google which pages on the site are the most significant, with 1.0 being the highest priority.
When you’re finished configuring your sitemap, you’ll see a note at the top of your Sitemap Settings that says, “Search Engines haven’t been notified yet. Create an article to inform people about your sitemap.” We need to write a post to let Google know that we have a new sitemap on our website.
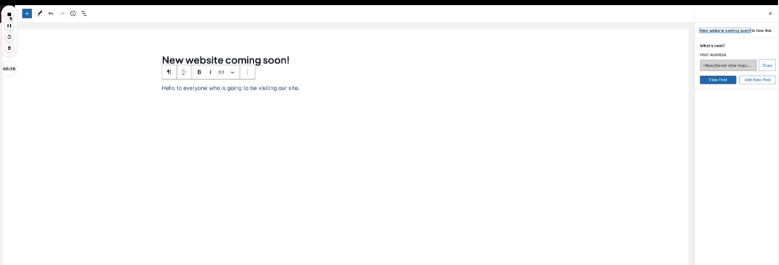
To do that, hover your mouse over “Post” at the left hand pane and click on “Add new”. Write a content and click “”Publish” at the top right panel. The reason we want to do this is because publishing that content essentially sends out the fillers to Google the next time it visits your website. Please keep in mind that this is only applicable if you have a new website. It just informs Google that new post content has been added to this domain. So, you don’t need to add new post once you are done setting up your sitemap if you already posted content on your website.
Conclusion
Having an XML sitemap is an excellent way to promote your website by enhancing SEO and getting rid of any link issues you may be experiencing. The use of proper URLs can assist search engines in getting to all of your pages and crawling them in a timely manner, ensuring that all new or updated information is not overlooked. A well-tuned sitemap can provide numerous benefits and establish all of the essential circumstances for your website to rise to the top.