For the longest time, WordPress and WordPress MU have been two separate entities. Word on the street was they were attempting to merge the two platforms, but many of us thought it was too large of an undertaking to be ready for the release of WordPress 3.0. Thankfully, we were all wrong. WP 3.0 has integrated all of the core functionality of WPMU, though for some reason it is not an available feature by default. You need to take a few extra steps to activate it.
The first thing you need to do to get your multi-user network started is add this piece of code to your wp-config.php file:
define ('WP_ALLOW_MULTISITE', true);
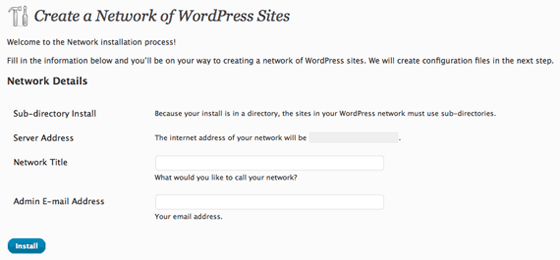
Place it right before /* That's all, stop editing! Happy blogging. */, save it and upload it back to your site. You should now see a new link called “Network” under the Tools panel in your wp-admin. Click on that and you will be brought to this page:
Add a network title and an admin email address then click install.
Your network is now installed, but you need to add a bit more code to a few files to get it all working smoothly. Create a directory called blogs.dir in your wp-content folder. This is for uploaded media from your additional sites. It needs to be writeable by the web server so you have to set the permissions to 0666 (-rw-rw-rw-).
Next, you have to edit your wp-config.php file again. On the network page, there will be a piece of code similar to this:
define( 'MULTISITE', true );
define( 'SUBDOMAIN_INSTALL', false );
$base = '/';
define( 'DOMAIN_CURRENT_SITE', 'your-site.com' );
define( 'PATH_CURRENT_SITE', '/' );
define( 'SITE_ID_CURRENT_SITE', 1 );
define( 'BLOG_ID_CURRENT_SITE', 1 );
Add this directly below the define ('WP_ALLOW_MULTISITE', true ); from above. Save and upload the file back to your server.
The last step requires you to add some code to your .htaccess file. If you don’t have one, create it and upload it to your root directory. If you use pretty permalinks, you will have to replace the original code in your .htaccess with the code below:
RewriteEngine On
RewriteBase /
RewriteRule ^index\.php$ - [L]
# uploaded files
RewriteRule ^([_0-9a-zA-Z-]+/)?files/(.+) wp-includes/ms-files.php?file=$2 [L]
# add a trailing slash to /wp-admin
RewriteRule ^([_0-9a-zA-Z-]+/)?wp-admin$ $1wp-admin/ [R=301,L]
RewriteCond %{REQUEST_FILENAME} -f [OR]
RewriteCond %{REQUEST_FILENAME} -d
RewriteRule ^ - [L]
RewriteRule  ^([_0-9a-zA-Z-]+/)?(wp-(content|admin|includes).*) $2 [L]
RewriteRule  ^([_0-9a-zA-Z-]+/)?(.*\.php)$ $2 [L]
RewriteRule . index.php [L]
Once you have completed all of the above, you will be prompted to log out and log back in. If everything is in place, you should now see a Super Admin panel in the top-left of your wp-admin. That’s where you will be able to create new sites and manage your multi-user network.


